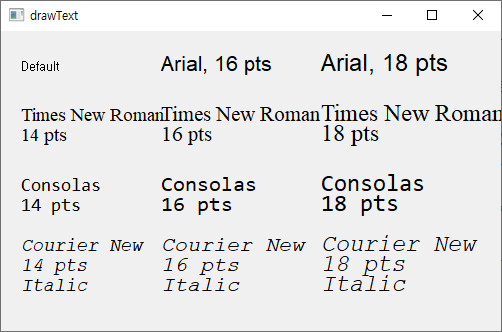
drawText() 에 x, y 위치와 표시할 텍스트를 순서대로 입력하면 텍스트를 표시할 수 있습니다.
56-1 예제: ex55
| import sys from PyQt5.QtWidgets import QApplication, QWidget from PyQt5.QtGui import QPainter, QPen, QBrush, QColor, QFont from PyQt5.QtCore import Qt class MyApp(QWidget): def __init__(self): super().__init__() self.initUI() def initUI(self): self.setGeometry(300, 300, 500, 300) self.setWindowTitle('drawText') self.show() def paintEvent(self, e): qp = QPainter() qp.begin(self) self.draw_text(qp) qp.end() def draw_text(self, qp): qp.drawText(20, 40, 'Default') qp.setFont(QFont('Arial', 16)) qp.drawText(160, 40, 'Arial, 16 pts') qp.setFont(QFont('Arial', 18)) qp.drawText(320, 40, 'Arial, 18 pts') qp.setFont(QFont('Times New Roman', 14)) qp.drawText(20, 90, 'Times New Roman') qp.drawText(20, 110, '14 pts') qp.setFont(QFont('Times New Roman', 16)) qp.drawText(160, 90, 'Times New Roman') qp.drawText(160, 110, '16 pts') qp.setFont(QFont('Times New Roman', 18)) qp.drawText(320, 90, 'Times New Roman') qp.drawText(320, 110, '18 pts') qp.setFont(QFont('Consolas', 14)) qp.drawText(20, 160, 'Consolas') qp.drawText(20, 180, '14 pts') qp.setFont(QFont('Consolas', 16)) qp.drawText(160, 160, 'Consolas') qp.drawText(160, 180, '16 pts') qp.setFont(QFont('Consolas', 18)) qp.drawText(320, 160, 'Consolas') qp.drawText(320, 180, '18 pts') qp.setFont(QFont('Courier New', 14, italic=True)) qp.drawText(20, 220, 'Courier New') qp.drawText(20, 240, '14 pts') qp.drawText(20, 260, 'Italic') qp.setFont(QFont('Courier New', 16, italic=True)) qp.drawText(160, 220, 'Courier New') qp.drawText(160, 240, '16 pts') qp.drawText(160, 260, 'Italic') qp.setFont(QFont('Courier New', 18, italic=True)) qp.drawText(320, 220, 'Courier New') qp.drawText(320, 240, '18 pts') qp.drawText(320, 260, 'Italic') if __name__ == '__main__': app = QApplication(sys.argv) win = MyApp() sys.exit(app.exec_()) |
56-2 결과
56-3 예제2
| import sys from PyQt5.QtWidgets import QApplication, QWidget from PyQt5.QtGui import QPainter, QPen, QBrush, QColor, QFont from PyQt5.QtCore import Qt, QRect class MyApp(QWidget): def __init__(self): super().__init__() self.initUI() def initUI(self): self.setGeometry(300, 300, 500, 300) self.setWindowTitle('drawText') self.show() def paintEvent(self, e): qp = QPainter() qp.begin(self) self.draw_text(qp) qp.end() def draw_text(self, qp): rect1 = QRect(10, 15, 210, 60) qp.drawRect(rect1) qp.drawText(rect1, Qt.AlignHCenter, 'AlignHCenter') rect2 = QRect(230, 15, 210, 60) qp.drawRect(rect2) qp.drawText(rect2, Qt.AlignRight, 'AlignRight') rect3 = QRect(10, 85, 210, 60) qp.drawRect(rect3) qp.drawText(rect3, Qt.AlignVCenter, 'AlignVCenter') rect4 = QRect(230, 85, 210, 60) qp.drawRect(rect4) qp.drawText(rect4, Qt.AlignCenter, 'AlignCenter') rect5 = QRect(10, 155, 210, 60) qp.drawRect(rect5) qp.drawText(rect5, Qt.AlignVCenter | Qt.AlignRight, 'AlignVCenter | AlignRight') rect6 = QRect(230, 155, 210, 60) qp.drawRect(rect6) qp.drawText(rect6, Qt.AlignBottom, 'AlignBottom') rect7 = QRect(10, 225, 210, 60) qp.drawRect(rect7) qp.drawText(rect7, Qt.AlignBottom | Qt.AlignHCenter, 'AlignBottom | AlignHCenter') rect8 = QRect(230, 225, 210, 60) qp.drawRect(rect8) qp.drawText(rect8, Qt.AlignBottom | Qt.AlignRight, 'AlignBottom | AlignRight') if __name__ == '__main__': app = QApplication(sys.argv) win = MyApp() sys.exit(app.exec_()) |
56-4 설명
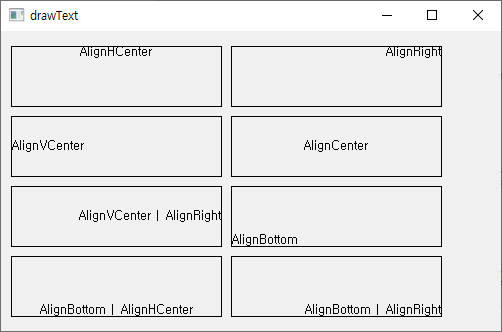
텍스트가 표시될 위치를 조절할 수 있습니다.
위 예제에서는 우선 QRect 클래스를 이용해서 사각형을 정의합니다.
이 사각형을 drawRect()와 drawText()에 입력함으로써 사각형을 그리거나 텍스트가 표시될 영역을 지정합니다.
drawText()에 텍스트 정렬을 위한 값을 입력할 수 있습니다. 디폴트로 왼쪽 위에 텍스트가 표시되지만 Qt.AlignRight, Qt.AlignBottom 등과 같이 다양한 옵션을 제공합니다.
또한 'Qt.AlignVCenter|Qt.AlignRight'와 같이 두 개의 값을 입력해줌으로써 두 가지 값을 모두 적용할 수 있습니다.
예를 들어, Qt.AlignCenter는 'Qt.AlignVCenter|Qt.AlignHCenter'와 같습니다.
(자세한 내용은 이 링크를 참고하세요)
56-5 결과
'프로그래밍 > PyQt5 GUI' 카테고리의 다른 글
| 57. 타이머 (0) | 2021.08.09 |
|---|---|
| 35. QPlainTextEdit (0) | 2021.08.09 |
| 55. 파이 그리기 (drawPie) (0) | 2021.07.30 |
| 54. 현 그리기 (drawChord) (0) | 2021.07.30 |
| 53. 호 그리기 (drawArc) (0) | 2021.07.30 |


